.png?height=120&name=wildcloud%20by%20WPCS%20logos%20(1).png)
The WaaS plugins are designed to streamline the process of selling and managing WooCommerce products. This article serves as a guide to setting up and managing your SaaS using the WaaS plugin suite.
Overview
The plugin suite, consisting of the WaaS-Client and WaaS-Host plugins, is designed to streamline the process of selling and managing WooCommerce products that represent different configurations of WordPress sites. This suite allows you to create a SaaS (Software as a Service) platform where customers can purchase a pre-configured WordPress site as a product. The suite automates the creation of these sites, known as tenants, and manages their configurations through a role-based system.
Tenants are created when a customer purchases a WooCommerce product that has been marked as a WPCS PRODUCT. Upon purchase, the WaaS-Host plugin makes an API request towards the wildcloud API to create a new Tenant. The request will contain information about the tenant role (its plugin configuration) and the snapshot it will be based on. The tenant role will be a PHP Constant on the tenant, used by the WaaS-Client plugin to enforce the activation/deactivation of plugins. The snapshot the tenant is provisioned with determines the starting point of the tenant and cannot be changed afterwards.
This article serves as a guide to setting up and managing your SaaS using the WaaS plugin suite. It will walk you through the necessary steps and considerations to ensure a successful deployment and operation of your platform on wildcloud.
Understanding the Tenant Role
The Tenant Role defines and manages the configurations of tenants within your SaaS platform. Unlike traditional user roles in WordPress that primarily dictate user permissions, roles in the context of WaaS are more comprehensive. They are used to specify the exact set of plugins that should be activated or deactivated on a tenant, effectively creating a tailored experience for different customer segments. To implement a role, you define it within the WaaS Client settings.
For instance, a digital agency aiming to provide an e-commerce setup would create a role specifically for that purpose. This role could be named E-COMMERCE within the WaaS Client settings, which includes a suite of plugins for shopping carts, payment gateways, and product catalogs. When a tenant site is provisioned with the ECOMMERCE role, the WaaS Client automatically activates all the plugins essential for operating an online store. In addition, the WaaS Client plugin actively monitors and adjusts the tenant's plugin set according to any updates made to the E-COMMERCE role throughout it’s lifecycle. This ensures that the tenant site is always equipped with the latest e-commerce functionalities and remains aligned with the service offerings defined by the agency.
It is crucial to understand that tenant users are not granted direct access to modify the plugin directory on the file system level, nor can they access the plugin management section within the WordPress dashboard. The plugins menu item is hidden by default to maintain a managed service environment. This design choice preserves the integrity of the configurations and plugin ecosystems in accordance with the predefined roles. By restricting access to both the file system and the dashboard's plugin management area, this approach simplifies the user experience by removing the complexities of plugin management and enhances security by preventing unauthorized modifications to the site's functionality.
The Tenant Role, therefore, is a framework to offer a variety of pre-configured WordPress site setups, catering to the diverse needs of their clientele. Whether it's a portfolio site, a membership platform, or an online marketplace, each can be represented as a distinct role within the WaaS ecosystem.
Tenant Role Recap
Here's a short overview of how roles operate within this system:
- Roles as Configurations: Roles determine the specific set of plugins activated on a tenant's WordPress site, enabling tailored service offerings.
- PHP Constants for Roles: Each role is defined by a PHP constant in the WaaS-Client plugin, automating plugin management for tenant sites.
- Restricted Plugin Access: Tenant users cannot directly access the plugin folder, ensuring a secure and managed service environment.
Using Tenant Snapshots
Tenant snapshots are essentially time-stamped archives of a WordPress site, encompassing all aspects such as content, theme customizations, plugin settings, and the complete database. These snapshots are especially beneficial for service providers who wish to provide their clients with a website that comes pre-configured to a specific standard.
When a client selects a WooCommerce product linked to a tenant snapshot, they are granted a tenant site that mirrors the exact setup stored in the snapshot. This includes not only the activation of the necessary plugins according to predefined roles but also the precise configurations, settings, and content that were in place at the moment the snapshot was captured.
Tenant snapshots represent a step beyond the basic version snapshots, which provide the default database configuration and file system for a version. While version snapshots set the baseline for plugin availability and the initial state of a tenant site, tenant snapshots allow for the preservation and replication of a site's unique configuration, offering a more customized and ready-to-use solution.
For more detailed information on creating and managing tenant snapshots, refer to the tenant snapshot documentation.
Examples for Configurations
Here are three example configurations demonstrating different set-ups using tenant snapshots and user roles:
Basic Blogging Platform
- Single Role (Role: Blogger): This role is designed for individuals or small businesses looking to establish a blog. It activates a curated set of plugins suitable for blogging, such as an SEO plugin, a social sharing plugin, and a simple theme.
- Version Snapshot: This configuration relies solely on the latest version snapshot. The version snapshot includes the default WordPress installation with the necessary plugins and themes as determined by the Blogger role.
Real Estate Solutions
- Three Roles (Role: Agent, Broker, Agency):
- Agent: Activates plugins for individual real estate agents, including property listings and CRM tools.
- Broker: Includes additional plugins for managing multiple agents and enhanced listing features.
- Agency: Offers a full suite of tools for large real estate agencies, including advanced analytics and marketing automation.
- Tenant Snapshots: Each role has a corresponding snapshot that includes pre-configured settings for the real estate market, with appropriate license keys for premium features.
Online Food Ordering Solution
- Single Role (Role: Restaurateur): This role equips tenants with a suite of plugins for menu management, online ordering, payment gateways, and delivery tracking.
- Multiple Tenant Snapshots:
- Fast Food Snapshot: Pre-configured for quick-service restaurants with features like rapid checkout and real-time order updates.
- Fine Dining Snapshot: Tailored for high-end restaurants, including reservation systems and sophisticated menu layouts.
- Food Truck Snapshot: Optimized for mobile eateries, focusing on location tracking and a simplified menu for on-the-go ordering.
Each snapshot includes theme settings and plugins that cater to the specific operational style and customer experience desired by different food establishments.
Sales Funnel Solution
- Three Roles (Role: Starter, Pro, Enterprise):
- Starter: Basic sales funnel plugins for creating landing pages and lead capture forms.
- Pro: Adds A/B testing capabilities, email marketing integrations, and more advanced analytics.
- Enterprise: Includes all Pro features plus CRM integration, advanced segmentation, and automation workflows.
- Tenant Snapshots for Each Role: Each role's snapshot comes with a set of pre-designed funnel templates and corresponding license keys for any premium plugins, allowing businesses to scale their sales strategies as they grow
Compatible Subscription Management Plugins
WooCommerce Subscriptions
When using WooCommerce Subscriptions, there are a few key differences to be aware of:
- Self Serve Dashboard: Customers have access to a self-service dashboard where they can manage their subscription details, such as upgrading or downgrading their plans, without needing to contact support.
- Add-ons: WooCommerce Subscriptions allows for the sale of add-on products or services along with the subscription. This can include one-time purchases or additional recurring services that complement the main offering.
Subscriptions for WooCommerce
Subscriptions for WooCommerce by WP Swings also has its unique features:
- It is a free alternative to the paid WooCommerce Subscriptions plugin, offering basic subscription management features suitable for startups and small businesses.
- The plugin may have different limitations or extended functionalities compared to WooCommerce Subscriptions, and it's important to review these to ensure they meet your business needs.
Please note that the WooCommerce High Performance Order Tables feature is not compatible with the WaaS setup. This feature is intended to optimize the performance of WooCommerce by creating custom database tables for orders.
Detailed set-up Guide
The set-up process involves configuring both the WaaS Host and WaaS Client to work in tandem. This section provides a detailed overview of the steps required to get your WooCommerce SaaS up and running.
Set up Storefront Site
Decide on the hosting environment for your Storefront. You have two options: hosting on wildcloud or self-hosting.
Hosted on wildcloud
For users who prefer to host their Store on wildcloud, you can select the Storefront application from the wildcloud library. Hosting on wildcloud allows us to help troubleshoot when issues occur. The Storefront application includes the necessary plugins and configurations, and it offers the option to connect your main application automatically by defining a PHP constant.
For a detailed guide on creating a storefront on wildcloud, please refer to this documentation.
Self-hosted Option
If you opt for the self-hosted route, follow these steps to ensure the smooth operation of your WooCommerce SaaS:
- WaaS Host Plugin: The WaaS Host plugin is essential for managing the creation of tenant sites and coordinating with the WaaS Client plugin. Download and activate the WaaS Host plugin on your self-hosted WordPress site.
- Stripe Plugin: Install and activate the Stripe plugin to securely process online transactions and accept payments on your WooCommerce site.
- WooCommerce Subscriptions: Implement a subscription management plugin for recurring revenue. Choose between the paid WooCommerce Subscriptions plugin or the free Subscriptions for WooCommerce by WP Swings.
WooCommerce Set-up in Storefront Site
Once you have installed the required plugins, proceed with the following steps to set up WooCommerce on your storefront site:
- Stripe Test Keys: Initially, configure Stripe with test API keys. This allows you to run through the entire purchase process without conducting real transactions. Once you're ready to go live, you can switch to the live API keys.
- Recommended Cronjob Frequency: To ensure that your SaaS platform operates efficiently, it's important to set up a cron job. A cron job automates routine tasks such as checking for subscription renewals and processing queued emails. For optimal performance, it is recommended to run the cron job every 5 minutes. However, the frequency may vary based on your hosting environment and the scale of your operations. You can set the CronJob schedule in the Application Configuration tab in your wildcloud application.
Install WaaS Client
Next, install the WaaS Client plugin in a version in your wildcloud application. This plugin will communicate with the WaaS Host and manage the tenant sites.
You can download the WaaS client here.
Create user roles and select corresponding plugins
Create user roles within the WaaS Client. Each role should correspond to a specific set of plugins and capabilities that you want to offer to your customers. View example configurations and set-ups for inspiration.

Create API key in wildcloud application
Generate an API key from your wildcloud application. This key is found in the settings or API Keys section of the wildcloud Console and is essential for connecting your storefront site.

Paste API keys in Storefront site
With the API key in hand, paste it into the appropriate field within the WaaS Host plugin settings on your storefront site. This will establish the connection between your storefront and the wildcloud application.

Creating and Managing WooCommerce products
Create a product
In your WooCommerce dashboard, create a new product that you want to offer as part of your SaaS platform.
Mark as WPCS product
- Mark the product as a WPCS product by checking the appropriate box. This action will:
- Add a field on the checkout page for customers to enter their desired website name. This name will be used to create a temporary subdomain for the tenant site. Customer are able to change their website name later via the WooCommerce "My Account" page.
- Enable your WooCommerce site to offer additional products and services that are not websites, such as website maintenance or other related services.
- Once the WPCS product box is checked, a new tab will appear in the left panel of the product configuration page. Navigate to this tab.
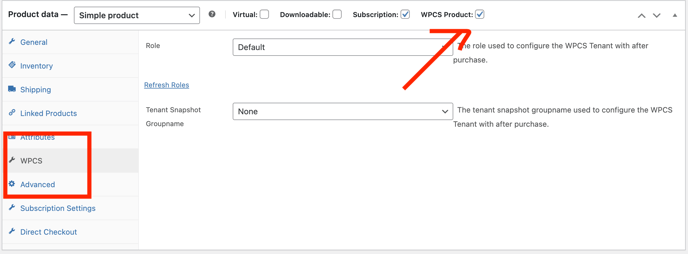
Configure the tenant
Configure the tenant according to the User Role and/or Tenant snapshot you've set up. This will determine the features and capabilities of the tenant site. Not seeing tenants? Learn how to troubleshoot.
Provide meta data
Provide meta data for the product, such as a photo, marketing text, and a name, then hit save.
Ready to go!
Congratulations! You have now set up an automated selling machine capable of provisioning and managing tenant sites.
Create a test order
Before going live, create a test order to ensure that the entire process, from checkout to tenant site creation, works seamlessly.
Add live keys to Stripe
Once you're confident that everything is functioning correctly, replace the Stripe test keys with live keys to start accepting real payments.
Host Settings
Here's a short overview of the settings available to you in the WaaS Host:
Tenant Root Domain
The Tenant Root Domain setting is used to configure a branded subdomain for each tenant site. By setting up a wildcard CNAME record (e.g., *.yourdomain.com), you enable the creation of subdomains for tenant sites that are automatically provisioned on wildcloud. This provides a personalized and branded experience for your customers, as each tenant site can be accessed through a unique subdomain of your choosing. For DNS setup, refer to the knowledge base documentation on DNS configuration.
Email Template
The Email Template setting allows you to customize the email communications sent from your platform. This is where you can ensure that the language, tone, and branding of the welcome email to match your company's style guide.
Custom User Role
The Custom User Role setting allows you to define a role with specific privileges for tenant site users. This role is designed to limit the user's capabilities within their WordPress dashboard, ensuring they have access only to the features and settings that are relevant to their subscription plan. By creating a custom user role, you maintain platform security and provide a simplified user experience.
Credentials
The Credentials section is where you verify that the correct API keys and other necessary credentials are in place for the WaaS Host plugin. This ensures proper communication between the WaaS Host and the WaaS Client.
Custom User Role
The Custom User Role setting is used to define a role with specific permissions for users on tenant sites. This custom role is designed to limit user access to only those features and settings that are necessary for their experience, which helps maintain platform security and simplifies the user interface.
Remove Administrator Plugin Capabilities on Tenant Creation
This setting is enabled by default to ensure platform security, maintain the integrity of the service offering, simplify the user experience, and reduce support overhead. By restricting tenants from managing plugins, the platform owner prevents unauthorized modifications, minimizes the risk of plugin conflicts, and ensures compliance with licensing agreements, all of which contribute to a stable and secure multi-tenant environment.
Notification Settings
The Notification Settings allow you to configure alerts for both you (the platform owner) and your users about significant events, such as the successful creation of a tenant site.
User Oriented Capabilities on the My Account Page
Each subscription on the platform is mapped to a unique website, allowing users to manage multiple subscriptions — and thus multiple websites — all from their account on your main site. Here are the capabilities available to users:
- One-Click Login: Users can utilize One-Click Login to access their tenant sites directly from the WooCommerce "My Account" page. This feature streamlines the login process, enhancing the user experience.
- Domain Change: Users have the ability to change their domain name from the "My Account" page. This allows for greater flexibility and personalization of their tenant sites.
- A-Records Display: The A-records, necessary for pointing a custom domain to the tenant site, are displayed within the user's account page. This information is essential for users who wish to use a custom domain rather than the provided subdomain.
- Subscription Switching: Through the Self Serve Dashboard, users can switch between subscription plans directly from the "My Account" page. This provides them with the autonomy to upgrade or downgrade their services as needed, and consequently, this switches the user role and the capabilities the user has access to, aligning their site's functionality with the chosen subscription level.
- Status Field: A status field is available for users to monitor the readiness of their site. This field provides updates on whether their site is being set up and is ready for use.
Client Settings
Editing and Deleting Roles
- Editing: To edit an existing role, go to the user roles section, select the role you want to modify, and make the necessary changes to its capabilities. Save the changes to update the role.
- Deleting: If you need to delete a role, choose the role from the list and use the delete option. Confirm the deletion. Note that you should reassign or remove any tenants associated with the role before deleting it.
Development Workflow for Introducing New Plans or Products
Testing and Developing with Versions
When planning to introduce a new plan or product, it's essential to follow a structured development and testing workflow:
- Develop and Test in a New Version: Start by creating a new version within your wildcloud application. This isolated version allows you to develop and test new features or configurations without impacting your live tenants. Utilize this space to refine your new plan or product.
- Testing Performance of Updated Role Using a New Version: Implement the updated role by setting it as a PHP constant in the tenant overview screen of the new version. This step is for testing the performance and ensuring the role functions as intended in a controlled environment.
- Change Production Version: After thorough testing and when you're confident in the new version's stability, you can promote it to be the production version. This critical update will make the new features and configurations available to all newly created tenants.
- Create a New WooCommerce Product: Reflect the changes in your WooCommerce store by creating a new product that aligns with the new plan or product. This is the tangible offering that customers will purchase to gain access to the new functionalities you've developed.
The Production Version and Tenant Creation
In the wildcloud application, tenants are always created under the production version. To introduce the latest features and configurations to new tenants, you must update the production version to the newly tested version. For comprehensive guidance on managing and changing the production version, you can refer to the documentation on version management.
Streamlining the Development Process
By adhering to this development workflow, you can safely roll out updates and new offerings. Testing in a new version ensures that any changes are reliable and ready for widespread use before they become the production standard. This methodical approach is designed to minimize service interruptions and uphold the quality of service that your customers expect. It's a strategy that balances innovation with stability, allowing for continuous improvement while maintaining a seamless user experience for existing tenants.
Trouble Shooting
User Not Created
When a user is not created during tenant provisioning, consider these key points:
- Existing User in Snapshot: The user may already exist in the snapshot used for the tenant. For instance, if the snapshot includes "your-email@example.com" and the storefront subscription is created with the same email, this will prevent a new user from being created.
- Non-existent Role in Snapshot: The storefront may attempt to create a user with a role that doesn't exist in the snapshot. Ensure the role specified at the storefront (using the correct slug, such as "custom-tenant-role") exists in the snapshot or version being used.
- Plugin Activation Exception: If there's a discrepancy between the active plugins in the role and those in the snapshot, plugin code may throw an exception during provisioning. This often occurs with plugins that require a specific activation process, like an installation wizard, and are not compatible with simple activation.
Tenant Not Created
- Review the WooCommerce Notes in the Order for any clues as to why the tenant creation failed.
- Confirm that the WaaS Client and Host settings are correctly configured and that the API keys are valid.
- Check that there are no server or network issues that might be interfering with the tenant creation process.
New Roles Not Appearing
- If using a staging or development environment, ensure that you have set the new version to production where the roles are expected to appear.
- Check that the plugin runs on the latest version.
Plugin Activation Issues
- Verify that all required plugins for the role are installed and up to date.
- Check for plugin conflicts by deactivating all plugins and then reactivating them one by one to identify any issues.
- Look for errors or warnings in the WordPress admin area that might indicate problems with plugin activation.
Final thoughts
This guide has walked you through the essential steps to set up and manage your SaaS platform, from understanding tenant roles to troubleshooting common issues. Should you encounter any challenges or have questions along the way, our support team is readily available to assist you. We are committed to helping you achieve a successful deployment and operation of your SaaS on wildcloud, ensuring a seamless experience for both you and your customers.